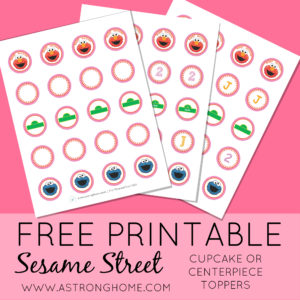
My daughter is crazy about Elmo! So I knew when her 2nd birthday came around, it had to be a Sesame Street party. Because I’m a very budget-conscious and busy working mom, I needed to plan a cute party that wouldn’t be too time consuming and wouldn’t cost too much. I just didn’t have the time to do a full DIY party (who does?), but buying all the decorations from Party City was not in my budget. And I’m guessing if you’re reading this, you may be in the same boat. This is why I’m passing along all my great tips and directions for creating some awesome decorations for your little one’s Sesame Street party!
Directions for all my decorations are below plus a free Sesame Street cupcake topper printable that you can personalize and print!
DIY Cupcake Stand
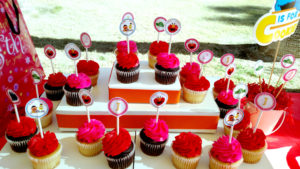
Since I didn’t think my cupcake toppers would fit under a regular tiered cupcake stand and I didn’t want to buy something that large (read: expensive), I made one that worked perfectly. This was the easiest thing I made, and I already had everything I needed except for the ribbon. So take a look through your stash of gift wrapping supplies, because chances are, you can scrounge up most of what you need for this. Mine is pretty simple because I didn’t want it to take attention away from the cupcake toppers, but you can wrap yours in pretty paper or add some fancy ribbon to really dress it up.
Supplies & Equipment Needed:
- 3 gift boxes – shirt sized – plain white or wrapped in paper
- 1 smaller flat box – plain white or wrapped in paper
- wrapping paper (optional)
- ribbon (optional)
- hot glue gun
Directions:
Take two of the shirt-sized gift boxes (begin with these unwrapped) and hot glue them so that they lay flat side-by-side lengthwise to form a large rectangle. If you are using wrapping paper, you can wrap them now. Also wrap the third box if you haven’t already.
If you are using ribbon, hot glue the ribbon around the outside of the large rectangle, the third shirt box, and the smaller box.
Stack the boxes to make three tiers. At this point, you can either hot glue the tiers to each other or leave it as is.
Elmo & Friends Centerpieces
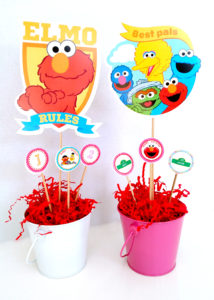
These centerpieces turned out so cute and only cost a little over $2 each. I got the little pails at Target for $1. I made the circle stickers myself (see printable below) and had the wooden skewers in my pantry. I cut some of the skewers down and put the cupcake toppers on them. The Elmo & Friends cutouts on the longer skewers can be found at the Dollar Tree as well as the foam circles I stuffed in the bottom of the pails to hold the skewers, and the red paper filler. (Another tip: check out the school/classroom supplies section at the Dollar Tree for a ton of Sesame Street stuff!)
DIY Elmo Headband
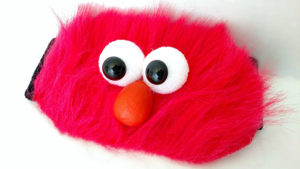
This turned out a lot better than I thought it would and it didn’t take long at all to make after I painted the nose.
I found everything at JoAnn Fabric:
- Fabric headband
- Red craft fur
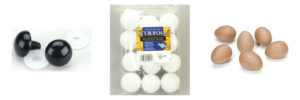
- 2 – Styrofoam or smooth foam balls – 1-1/2 inch
- 2 – Solid black doll eyes – .71 inch/18mm
- 1 – Paper Mache Eggs – 37mm
- Orange paint (I used Craft Essentials Acrylic Paint in Orange Spice)
You’ll also need:
- Hot glue gun
- Skewer
- glass or vase
Directions:
Skewer the small end of the paper mache egg and paint it orange. Place it in the glass or vase to dry. You may need 2-3 coats of paint.
Cut out a small rectangular piece of craft fur to fit on the top of the headband, rounding the corners. Shake out any excess fur. Glue the rectangle to the headband.
Push a doll eye into each of the Styrofoam balls. They should fit snugly, but if you find them loose you can use a little glue to hold them down. Hot glue the balls (eyes) to the fur.
Hot glue the orange paper mache egg to the fur just under the eyes, small end toward the eyes.
That’s it! Super easy, right?
Sesame Street Favor Bags
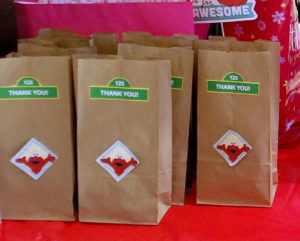
I’ve had a large package of brown lunch bags in my pantry forever, so any chance I get to use them, I do. I didn’t spend too much time on the bag itself because small children are going to go straight for the favors inside! I made the Thank You sign in Microsoft Word using shapes and text boxes, printed it on white rectangular mailing labels, and cut the signs out. I put some cute Elmo stickers that I found on the front of the favor bag below the Thank You sign. Since Elmo’s tagline is, “I love my goldfish and my crayons, too,” I put a few crayons (in a snack-sized Ziploc bag), a coloring book I printed out, and a snack sized bag of Whole Wheat Goldfish Crackers in each favor bag. You can get a large package of crayons at Wal-Mart or Target for pretty cheap.
I made this coloring book in Microsoft Word and just found some images online by searching for Sesame Street Coloring Pages. You can also find some great printables on the Sesame Street website.
Personalizable Sesame Street Cupcake Toppers – Free Printable!
My favorite little details were these cute cupcake toppers. I used 1-1/2 inch round Avery Labels (#8293), placing a lollipop stick between two labels back to back. You can also use these for the centerpieces. This printable is only available to email subscribers, so scroll down to sign up!
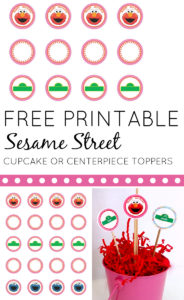
The design I made for the toppers is pink and orange, so I ordered pink and red iced cupcakes from our local grocery store. Save even more money by making cupcakes yourself!

These cupcake toppers are free for you to personalize and print – just subscribe below to download:
The free printable is for your personal use only. Please do not forward or distribute. If you’d like to send this to a friend, please forward the link to this post or pin the image below.
Tips for Use:
- You can either use Avery Labels (8293) – 1-1/2 inch round white labels or print them out on plain white paper or cardstock and use a 1-1/2 inch round punch to cut them out.
- The quickest way to personalize this is to edit the PDF to add text. You’ll need Adobe Acrobat Reader, which is free.
- Personalizing Letter/Number circles: I recommend using a font such as Comic Sans with 48 size in orange.
- Personalizing Sign circle: Use font size no greater than 12 in white to enter a name; it’s best to use about a size 10 font for the number in the semi-circle.
- Another way to personalize this is if you have Adobe Acrobat Pro. You can create your letters and number images in a graphic design tool such as PicMonkey (which is free), and then add the image to your PDF.
- You can also convert the PDF to an image, use PicMonkey to add some fun text, then convert it back to a PDF to print. This doesn’t always come out as clear and the circles may not line up nicely if you are using the Avery labels. This is only recommended if you are using the punch to cut out the circles.
