A Strong Home

Inspiration and encouragement for mothers and household managers

  • Home
  • Start Here
    • Meet Jen
    • Disclaimer & Policies
  • Marriage
  • Mom Life
    • Parenting
    • Pregnancy
  • At Home
    • Meals
    • Cleaning
    • Budgeting
    • DIY
      • Home DIY
      • Events/Parties
      • Crafts
  • Contact

2019 Adventures – From the Sonoran Desert to the Blue Ridge Mountains

January 28, 2020

So much has happened over the past year. In February 2019, our family moved across the country from Phoenix, AZ to Southwest Virginia. It was a long process, but we are so happy we made this decision for our family. The easy part was selling our home in a sought after family-friendly neighborhood of Gilbert, AZ. Jacob did a wonderful job of making it our dream home over the nearly three years we lived there. If we could have somehow brought that house with us to our ideal climate and town, we would have. The hard part was leaving our family and friends and the community we had grown to love. We said goodbye to everyone and had our last double-birthday party in Arizona for Julia and Jacob the weekend before we left. Jacob and I took a little break from packing to say farewell to the desert and the mountains Jacob had lived near his entire life.

The long trip was made easier with three adults – my mom decided to come with us to Virginia and be a stay-at-home Grandma! We had lots of snacks, activities, a tablet, and this handy carseat cart to pull one of the girls through the airport while we pushed the other in the stroller. We brought both carseats on the plane with us and the baby napped a little on the flight. The flight in was my very first glimpse of our new home – Jacob was the only one who had gone over during his interviews with his new company. I relied on pictures, local Facebook mom groups, Google maps, and some new local friends to help us finalize our decision to move. There was so much that went into that – hours of research on schools, neighborhoods, daycare centers, events and local activities, short term rentals, and the housing market. Every new bit of information I found only made a better case for us moving to this area – it was the perfect size, population, and climate that we were looking for.

We started off in a short-term furnished rental home in a beautiful neighborhood, crammed in with our landlord’s furniture and our own, plus all of our unpacked boxes. Everyday was an adventure. Our 1-year old took her first steps surrounded by moving boxes. We saw our first Virginia snowfall and the girls played in snow for the very first time. We had lots of encounters with new wildlife (deer, groundhogs, cardinals, and blue jays). It was magical, but we knew we had a long road ahead of us. To make things more interesting, a couple months after the move I decided to leave my company and return to a former employer. This meant a busier schedule for me, but also the opportunity to meet with co-workers in the local office.

With my mom helping out watching the girls, Jacob and I started the process of house hunting during any free time we could find. This was much more challenging than we were anticipating. The houses we checked out were on lots with great views, but the lots themselves were often sloped with no usable backyard. The flat lots we found usually had older homes built on them. We found a slightly older house to purchase that needed (and still needs) some work. It is in the perfect location, on a great lot, and has plenty of room for our family. After getting the priority work done, we moved in and started our list of weekend projects. Just as we were starting to decorate the basement playroom, we had a heavy rainfall and the basement flooded. Jacob and I were bailing water for an entire day! Luckily, there wasn’t a ton of damage. We did, however, decide it was time this house had a sump pump and French drain installed. After the dust settled and summer was almost at an end, we finally had both projects completed. Jacob did almost all of the French drain work himself and redid the front entry landing. It looks great now, and I can’t wait for spring to come so we can plant all the pretty flowers!

While all of this was happening, we did get a few moments here and there to enjoy our new city. The area in the Blue Ridge Mountains is breathtaking. The spring has beautiful blooming trees in white, light pink, and dark pink and everything is so green! Summer is just as lovely and offers great opportunities to get out on the lakes and rivers. But the season I was looking forward to the most was autumn, and Virginia definitely did not disappoint! The colors were amazing – I had never seen anything like that before. Just driving to the grocery store was a magical experience with the reds, yellows, and oranges that filled the mountains all around us.

This past year was not all about picking paint colors and enjoying the mountain scenery of our new home, though. Our family experienced great loss and grief over the past several months that made me appreciate all I have and have gone through. I believe that the trials and pain we go through in life make us stronger and can teach us healing and coping mechanisms that will help when a great tragedy occurs. I am grateful for the strong support system and close family and friends I can depend on. We’ve found an amazing new church family, we’re meeting new friends in the community, and it looks like I’ve found my local #momtribe with some interesting and fun ladies.

All in all, it was a year of growth, life changing experiences, and many adventures. This year we plan to finally get out and explore. We’re hoping to use our time off to travel around Virginia, North Carolina, and maybe Tennessee. I am looking forward to the coming months and all 2020 has to bring!

Follow me on Pinterest!


Filed Under: At Home, DIY, Home DIY, Marriage, Mom Life Tagged: home, moving, renovations, travel, Virginia

2 Best-Kept Secrets for Surviving Cold & Flu Season

March 7, 2017

I’m laying on the couch, snuggling my sniffling toddler while we watch yet another episode of Sesame Street. Suddenly she sticks her germy little finger right into my mouth without any warning. “Mama, aaahhhh!” she happily sticks out her tongue. Yes, Mommy has a tongue just like you. A day or so later, I wake up with a sore throat, which quickly turns into a nasty cold. Sound familiar? We’ve been told by multiple doctors that the first year of daycare or grade school is the worst for your health. Kids bring home every wretched bug known to man and kindly share it with the rest of the family. If you’re like me, you get the worst of it, even if your kids have just a slight sniffle.

Sick Toddler Coloring
Exhibit A: Sniffling toddler coloring without a care in the world

Our family doctors and pediatrician have told us a few times that there isn’t much you can do for prevention besides just hand washing. So we have a rule that as soon as we enter the house, all hands, large and small go to the sink to suds up. I’m sure it’s helped a little, but I haven’t noticed a big difference except that we haven’t contracted the stomach bug since implementing our new rule. With a toddler that can cover nearly every surface with her cold germs (I’ll spare you specifics) in about an hour, we still had a big problem preventing cold germs from spreading.

Finally, Something That Actually Works!

This year, I was determined to stay healthy. We’ve nearly come to the end of cold and flu season, which was pretty bad this year in the Armstrong home and I have finally found the answer! Julia has caught two colds since I started my new regimen and I haven’t gotten sick once…even after she sneezed right into my mouth while we were singing The Wheels on the Bus. Yep, kids are gross.

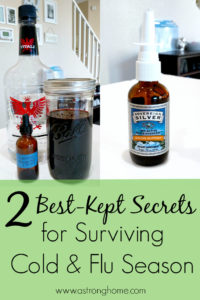
So, what is my secret? It involves Vodka. Yes, that is one of the main ingredients for my powerful Immune-boosting regimen. If you have a problem going to the store and picking up a big bottle of Vodka, you’re going to have to get over it. Or send a friend or your husband, because this REALLY does work.

Surviving Cold and Flu Season

*Disclaimer: This post is for educational purposes only. I am not a physician or nutritionist. Please always consult your physician before taking any natural herbs, remedies, or medications, especially if you are pregnant, nursing, or on other medications. The following has only been used for adults and is not recommended for children.

(Note: Some links in this post are affiliate links. Read our disclaimer here.)

Homemade Elderberry Tincture

The first thing I started doing was taking an Elderberry Tincture that I made myself. I stumbled upon this while trying to find a safe immune-boosting tincture while I was pregnant and everything I saw had Elderberry in it. I tried several different tinctures before I decided that Elderberry was the one common ingredient that was helping me the most. The problem was, that little bottle of Elderberry was horribly expensive, especially since I was taking it up to 3 times a day! When I visited our local herb shop to find a better solution, they told me that I can buy the dried elderberries and just make a tincture myself. Luckily, my mother-in-law has a great co-op in her town and was able to get a big bag of elderberries for me to use for a great price. You can also find some quality dried elderberries on Amazon here. I also picked up a big bottle of vodka from the grocery store. Because this has worked so great for me, I’m sharing this recipe with you. I hope it has the same effects for you too! Make sure you make this well in advance of cold and flu season, because it takes 4-6 weeks to set.

Here’s everything that you’ll need:

  • A glass jar with lid (as big or small as you want)
  • Dried elderberries (enough to fill your jar half-full)
  • 80-proof Vodka (the cheap stuff is fine)
  • Amber glass bottle with dropper (you can find this at your natural grocer or herb shop – or Amazon)
  • brown paper bag
  • funnel
  • bowl
  • fine strainer or cheesecloth

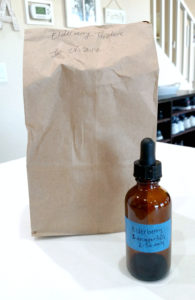
Fill your jar half-way with dried elderberries. Add Vodka, leaving 1-inch head space at the top of the jar. Close your jar, write the date on your paper bag and place the jar in the bag. Set this in a cool, dark place for 4 – 6 weeks. I placed it in the back of my pantry. Every day or so (or whenever you remember), shake it once gently.

Elderberry Tincture

After 4-6 weeks, it’s time to strain the elderberries out. Open your jar and strain the elderberries over a medium bowl to catch the tincture liquid. It’s best to use cheesecloth or a really fine sieve so you don’t get too much residue left over. Discard the elderberries. Fill the amber glass bottle using your funnel and pour the leftover liquid back into the larger glass jar to store.

To use: I’ve heard that the alcohol helps your body absorb the elderberry tincture better, so I add 20-30 drops (or a dropper-full) to a shot glass of water. I take this 2 – 3 times a day, depending on how I feel and if anyone in the house is sick.

If you have any religious or personal beliefs that prevent you from drinking alcohol, don’t worry – I’ve got you covered! You can either add the tincture to a mug of hot water or to your hot tea. This should burn off the alcohol and also dilute it greatly. I did this while I was pregnant just to be safe.

If you have children (over 1 year old) you want to give this to or you really don’t want to make this with alcohol, there is an elderberry syrup you can make with honey. There’s a great recipe over at Mommypotamus here. I actually made the Elderberry syrup and my daughter liked it the first couple times. I will probably try this again and see if she does better this time.

Don’t have time to make this yourself, or maybe you can’t get your hands on some quality elderberries? Check out this helpful guide over at Health Ambition to find the best elderberry supplement on the market. There’s also some more great information about the health benefits of elderberries.

Colloidal Silver

This is just as important as the Elderberry. There are so many benefits to using Colloidal Silver, but my main concern is Cold, Flu, and Sinusitis prevention. Jacob and I are both prone to sinusitis. It seems like every cold or seasonal allergies will cause us to have a sinus infection. We were told about this by our Chiropractor and finally decided to give it a try.

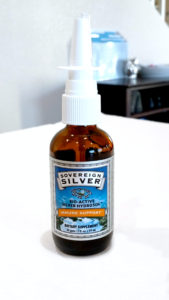
Colloidal Silver

Colloidal Silver comes in a few different delivery methods. There are drops, sprays, and nasal spray pumps. We’ve only used the nasal spray, but you can also use the drops in a Neti pot. I use the nasal spray 1-2 times a day, depending on how I’m feeling. The dosage is 10 sprays, but I don’t use the full 10 sprays unless I’m feeling something coming on or I’ve had a toddler sneeze in my face.

If you already have a sinus infection, you can use the drops to help. Put a couple drops in your nose and lay down with your head hanging over the edge of the bed or couch. Do this for 5 – 10 minutes.

Another amazing thing that we’ve noticed is that this seems to be helping with seasonal allergies. Jacob has always had pretty bad seasonal allergies and he hasn’t suffered so far this season. I’m hoping this lasts!

Some things to note: Only use Colloidal Silver from a trusted source. I recommend Sovereign Silver, which is Bio-Active Silver Hydrosol and is very pure and refined colloidal silver. There are some cheaper products that are marketed as colloidal silver, but are actually ionic silver or silver protein. These can cause argyria – which will turn your skin blue or blue-gray and is irreversible.

You can find the nearest retailer that carries Sovereign Silver by going to their website: https://www.natural-immunogenics.com/store-locator/

I am in no way affiliated with Natural Immunogenics Corporation, the maker of Sovereign Silver. These opinions are fully my own.

If you’re pregnant, trying to become pregnant, or nursing, please consult with your physician before using colloidal silver. Colloidal silver has not been proven safe or unsafe for use during pregnancy. Use your best judgement after doing the proper research and talking to your physician.

So there you have it – give it a try and let me know if these help you as much as they have me.


Follow me on Pinterest!


Filed Under: DIY, Health & Wellness Tagged: cold & flu prevention, colloidal silver, elderberry

Sesame Street Birthday Party on a Budget {Free Printable}

February 22, 2017

DIY Sesame Street Party Decor

My daughter is crazy about Elmo! So I knew when her 2nd birthday came around, it had to be a Sesame Street party. Because I’m a very budget-conscious and busy working mom, I needed to plan a cute party that wouldn’t be too time consuming and wouldn’t cost too much. I just didn’t have the time to do a full DIY party (who does?), but buying all the decorations from Party City was not in my budget. And I’m guessing if you’re reading this, you may be in the same boat. This is why I’m passing along all my great tips and directions for creating some awesome decorations for your little one’s Sesame Street party!

Directions for all my decorations are below plus a free Sesame Street cupcake topper printable that you can personalize and print!

DIY Cupcake Stand

DIY Cupcake Stand

Since I didn’t think my cupcake toppers would fit under a regular tiered cupcake stand and I didn’t want to buy something that large (read: expensive), I made one that worked perfectly. This was the easiest thing I made, and I already had everything I needed except for the ribbon. So take a look through your stash of gift wrapping supplies, because chances are, you can scrounge up most of what you need for this. Mine is pretty simple because I didn’t want it to take attention away from the cupcake toppers, but you can wrap yours in pretty paper or add some fancy ribbon to really dress it up.

Supplies & Equipment Needed:

  • 3 gift boxes – shirt sized – plain white or wrapped in paper
  • 1 smaller flat box – plain white or wrapped in paper
  • wrapping paper (optional)
  • ribbon (optional)
  • hot glue gun

Directions:

Take two of the shirt-sized gift boxes (begin with these unwrapped) and hot glue them so that they lay flat side-by-side lengthwise to form a large rectangle. If you are using wrapping paper, you can wrap them now. Also wrap the third box if you haven’t already.

If you are using ribbon, hot glue the ribbon around the outside of the large rectangle, the third shirt box, and the smaller box.

Stack the boxes to make three tiers. At this point, you can either hot glue the tiers to each other or leave it as is.

Elmo & Friends Centerpieces

DIY Sesame Street Centerpieces

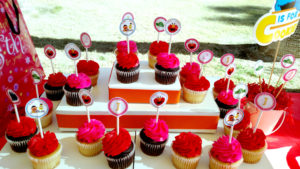
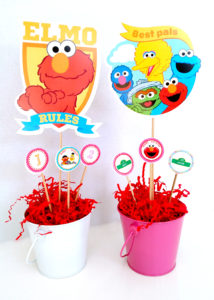
These centerpieces turned out so cute and only cost a little over $2 each. I got the little pails at Target for $1. I made the circle stickers myself (see printable below) and had the wooden skewers in my pantry. I cut some of the skewers down and put the cupcake toppers on them. The Elmo & Friends cutouts on the longer skewers can be found at the Dollar Tree as well as the foam circles I stuffed in the bottom of the pails to hold the skewers, and the red paper filler. (Another tip: check out the school/classroom supplies section at the Dollar Tree for a ton of Sesame Street stuff!)

DIY Elmo Headband

DIY Elmo Headband

Elmo Headband Supplies

This turned out a lot better than I thought it would and it didn’t take long at all to make after I painted the nose.

I found everything at JoAnn Fabric:

  • Fabric headband
  • Red craft fur
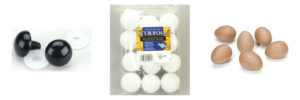
  • 2 – Styrofoam or smooth foam balls – 1-1/2 inch
  • 2 – Solid black doll eyes – .71 inch/18mm
  • 1 – Paper Mache Eggs – 37mm
  • Orange paint (I used Craft Essentials Acrylic Paint in Orange Spice)

You’ll also need:

  • Hot glue gun
  • Skewer
  • glass or vase

Directions:

Skewer the small end of the paper mache egg and paint it orange. Place it in the glass or vase to dry. You may need 2-3 coats of paint.

Cut out a small rectangular piece of craft fur to fit on the top of the headband, rounding the corners. Shake out any excess fur. Glue the rectangle to the headband.

Push a doll eye into each of the Styrofoam balls. They should fit snugly, but if you find them loose you can use a little glue to hold them down. Hot glue the balls (eyes) to the fur.

Hot glue the orange paper mache egg to the fur just under the eyes, small end toward the eyes.

That’s it! Super easy, right?

Sesame Street Favor Bags

DIY Elmo Favor Bags

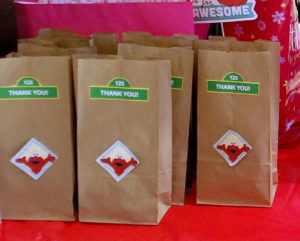
I’ve had a large package of brown lunch bags in my pantry forever, so any chance I get to use them, I do. I didn’t spend too much time on the bag itself because small children are going to go straight for the favors inside! I made the Thank You sign in Microsoft Word using shapes and text boxes, printed it on white rectangular mailing labels, and cut the signs out. I put some cute Elmo stickers that I found on the front of the favor bag below the Thank You sign. Since Elmo’s tagline is, “I love my goldfish and my crayons, too,” I put a few crayons (in a snack-sized Ziploc bag), a coloring book I printed out, and a snack sized bag of Whole Wheat Goldfish Crackers in each favor bag. You can get a large package of crayons at Wal-Mart or Target for pretty cheap.DIY Elmo Coloring Book

I made this coloring book in Microsoft Word and just found some images online by searching for Sesame Street Coloring Pages. You can also find some great printables on the Sesame Street website.

Personalizable Sesame Street Cupcake Toppers – Free Printable!

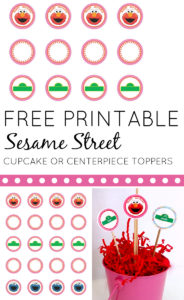
My favorite little details were these cute cupcake toppers. I used 1-1/2 inch round Avery Labels (#8293), placing a lollipop stick between two labels back to back. You can also use these for the centerpieces. This printable is only available to email subscribers, so scroll down to sign up!

Free Printable Sesame Street Cupcake Topper

The design I made for the toppers is pink and orange, so I ordered pink and red iced cupcakes from our local grocery store. Save even more money by making cupcakes yourself!


These cupcake toppers are free for you to personalize and print – just subscribe below to download:


Subscribe to download your free printable!


The free printable is for your personal use only. Please do not forward or distribute. If you’d like to send this to a friend, please forward the link to this post or pin the image below.

Free Printable Sesame Street Cupcake Topper

Tips for Use:

  • You can either use Avery Labels (8293) – 1-1/2 inch round white labels or print them out on plain white paper or cardstock and use a 1-1/2 inch round punch to cut them out.
  • The quickest way to personalize this is to edit the PDF to add text. You’ll need Adobe Acrobat Reader, which is free.
    • Personalizing Letter/Number circles: I recommend using a font such as Comic Sans with 48 size in orange.
    • Personalizing Sign circle: Use font size no greater than 12 in white to enter a name; it’s best to use about a size 10 font for the number in the semi-circle.
  • Another way to personalize this is if you have Adobe Acrobat Pro. You can create your letters and number images in a graphic design tool such as PicMonkey (which is free), and then add the image to your PDF.
  • You can also convert the PDF to an image, use PicMonkey to add some fun text, then convert it back to a PDF to print. This doesn’t always come out as clear and the circles may not line up nicely if you are using the Avery labels. This is only recommended if you are using the punch to cut out the circles.


Follow me on Pinterest!


Filed Under: DIY, Events/Parties

Frugal Bride – DIY Aisle Chair Decor

September 5, 2014

Photo by: Nichol Davis

I loved making these decorations because they were so easy and very inexpensive.  Since I used artificial flowers, I was able to make these ahead of time and concentrate on other details. If you really want to use fresh flowers, that will work, too.

Here is what you will need:

  • A container with handles (or you can drill holes in the sides)
  • Floral foam, trimmed to fit snuggly
  • Rope or ribbon to go with the look you want
  • Artificial flowers

I found the floral foam and the copper containers at Dollar Tree, the rope from Home Depot, and the flowers from Michael’s. I also used fall-specific pieces like stems of leaves and pine cones.

You’ll want a large area to work on. First, create your bouquets. Push the floral foam pieces into your containers, trimming if needed to fit. The artificial flowers come in bunches, so you’ll need to clip each stem off the bunch to allow you to mix lots of different flowers into each arrangement. Start by creating a bouquet in your hand and then push them into floral foam in the containers. Make sure your bouquet is nice and full so you don’t see any gaps from the top or sides.

When you’re happy with your arrangement, tie your rope or ribbon to the handles of your container. I used a rope to give more of a rustic feel, but you can use anything that will hold. Make the loops long enough so that the container will hang the way you want.

Tips:
If you’re getting married in the fall next year, gather your fall decorations at the end of this fall season when they go on sale. This is the same with other seasons/holidays if you’re weaving that into your theme.
Go to the dollar store early and often to stock up on your wedding supplies.

Check out more from my Frugal Bride series!

http://www.astronghome.com/search/label/Frugal%20Bride


Follow me on Pinterest!


Filed Under: DIY, Events/Parties

Frugal Bride – DIY Wedding Signs

November 17, 2013

There are some really great ideas out there for rustic weddings.  One that I just had to do myself was the weathered wooden sign.  I made a few different signs from a bunch of old wooden planks that were sitting in a friend’s backyard.

Since our wedding was very informal, we didn’t have assigned seating for the ceremony or reception.  It had a very backyard picnic feel, which I loved.  To let our guests know that there was no assigned seating, we posted a sign at the entrance to the ceremony area.  These were just three pieces of wood planks screwed to a wooden post.

We had a ring bearer and a sign holder to announce the bride’s entrance.  Our “Here Comes the Bride Sign” was also just two wooden planks.  My husband attached them together with two galvanized straps.  He also added handles to the back to make it easier to hold.

These were really easy to make and added to the rustic feel of our wedding.  Keep it simple with black painted letters or add some color and stenciled designs.  Like the choice of wedding themes, the possibilities are endless!
Check out more from my Frugal Bride series!

Follow me on Pinterest!


Filed Under: Events/Parties, Uncategorized

  • 1
  • 2
  • Next Page »

Hi there!

Hi there!

Hello and welcome! I’m Jen, a proposal writer by day, blogger by night, happy wife and mommy. I live in SW Virginia with my husband, Jacob and our sweet girls, Julia and Jocelyn.

  • Email
  • Facebook
  • Instagram
  • Pinterest
  • Twitter

Favorite Posts

  • Sesame Street Birthday Party on a Budget {Free Printable}
  • pregnancy loss Saying Goodbye: My Silent Miscarriage
  • Surviving Cold and Flu Season 2 Best-Kept Secrets for Surviving Cold & Flu Season
  • Frugal Bride – DIY Wedding Signs

Sign up for our newsletter and never miss a post!

Archives

Looking for Something?

Disclaimer

A Strong Home is a participant in the Amazon Services LLC Associates Program, an affiliate advertising program designed to provide a means for us to earn fees by linking to Amazon.com and affiliated sites. Please read full disclaimer and policies here

About

About

I'm Jen. Thank you for visiting! You can find out more about me here.

Follow me on…

  • Email
  • Facebook
  • Instagram
  • Pinterest
  • Twitter

Get in Touch

Have some questions or comments? You can contact me here.

Archives

Theme Design By Studio Mommy · Copyright © 2023

Copyright © 2023 · Beyond Madison Theme on Genesis Framework · WordPress · Log in